Lemon Dome Cake

20160414-233021-84621177.jpgI’ve been tackling cakes in an entremet façon.. I just feel like cakes with different components and textures are an interesting thing to do.

Also, I made a jar of lemon curd which I posted on my previous post and decided to make this individual lemon cake.

Also, a heads up, this is not a step by step post since there are a lot of components in this lemon dome and also I did not take any picture since I wasn’t planning on posting it but this lemon dome turns out to be more successful than I thought. So.. Yes, the recipe will be a long one.

20160423-232655-84415366.jpgFor those of you who are not familiar with the word entremet, it’s a fancier version of your regular birthday cake. Usually consist of different texture and flavours that balance the whole thing instead of just regular cake and buttercream.

The most regular one to use is mousse as their main component. The base of entremets usually are the crunch factor. Some people use sable breton which is buttery, melt in your mouth shortbread cookies, or chocolate mixed with feuilletine (basically crunchy crepes) but not all entremet has to have a crunch factor, that’s why they sometimes use dacquoises (almond sponge), biscuit à la cuillère (lady fingers but since you made it from scratch usually people shape it into a disk for the base of your cake), génoise cake which what I’m using for this lemon dome, and many more. All types of cakes from brownies to chiffon cakes are often used for the cake part.

The insert of the entremet is where you can get creative with. Here, I fill them with strawberry jelly and lemon curd. Some use panna cotta, creme brulee like flan, fruit jellies, ganaches, and many more. It’s just how you balance the flavour all together.

20160423-234559-85559777.jpgAnd since you’re here, I think you deserve a close up look of the inside.

The components of this lemon dome are (from the bottom to the top layer):
• Lemon genoise cake soaked with lemon syrup
• Strawberry basil jelly
• Lemon curd
• Vanilla bean mascarpone mousse
• Lemon yogurt glacage

20160424-000201-121454.jpgI used some melted chocolate and fondant cut into little flowers to create those pretty swirly flowery decoration.

I am ridiculously proud of the flower decor on this lemon dome. Since I usually am not that good on the decor department but this lemon dome looks pretty aren’t they??

20160426-162154-58914134.jpgLook at that oozing lemon curd. It kind of act as the sauce but also the refreshing element of this lemon dome.

I made this lemon dome, other than to tackle cakes in an entremet way but also I was making something that my dad can also eat. My dad is not the biggest fan of anything sweet. Nope. Usually the desserts that I made were devoured by me, my mom and my sister, never my dad. He would probably eat a bite of two then that’s it. But my dad is the biggest fan of anything sour. His level of sour endurance is to the point where he snacks on sliced lemons. Just like that. So, since he like sour food, I decided to make this lemon dome.

I put some yogurt on the strawberry jelly so it would be as sour as my dad’s level of sour preference. Also yogurt on the glacage for the same reason, and also glacage is extremely sweet on it’s own since it uses sugar solution AND white chocolate for those coloured glacage. And since I haven’t found any less sweet alternative for the glacage, I decided to balance the sweetness with the lemon curd and yogurt.

For those of you who’s not the biggest fan of sour, you can omit or reduce the yogurt amount on both the jelly and glacage.

20160426-165740-61060488.jpgOkay, this lemon dome is a bit shy, it’s trying to hide behind the leaves.

20160426-171423-62063635.jpgOh yeah, I used some mirror glace with a bit of red food colouring for the red middle part, but you can use anything you got. You can use some melted candy melts, strawberry jam/jelly, white chocolate dyed red, or even some fondants dyed red. Well, that is of course if you want to make this lemon dome just like what I did. You can search for other alternatives on decorating if you’re not feeling for something too sweet looking like this

20160426-171901-62341622.jpgHave a good one everybody!

20160427-173646-63406054.jpg

Lemon Dome recipe
Makes 8, diameter of 5 cm domes

See lemon curd recipe here.
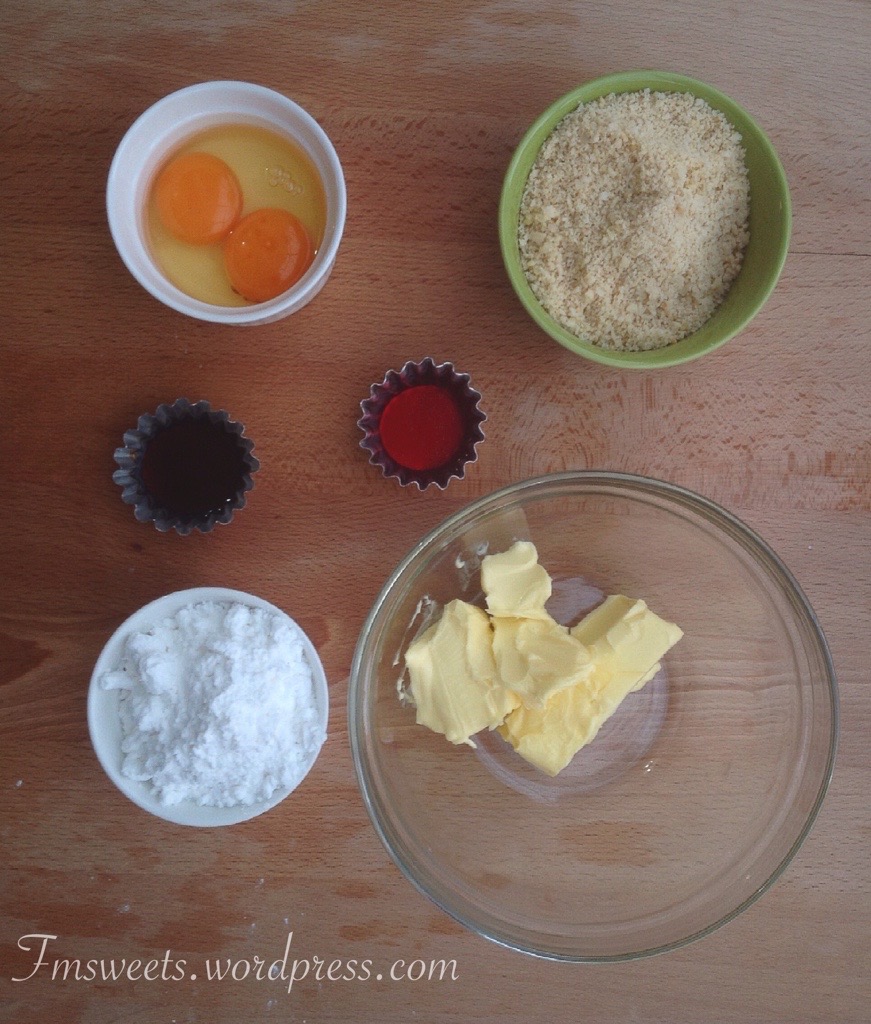
Ingredients:
Genoise cake
• 2 large eggs
• 45 g sugar
• 65 g cake flour
• a pinch of salt
• Zest of 1 lemon
• 5 g unsalted butter (melted)
• 7 ml milk
• ¼ tsp vanilla extract

Strawberry Basil Jelly
The quantity of the flavourings (basil, yogurt, sugar) can be added depending on your preference
• 10 pcs of big strawberry (washed and hulled, then cut into smaller pieces)
• 5-7 fresh basil leaves
• 50 g sugar
• 100 ml water
• 4 g gelatin powder (use 3g of gelatin if omiting the yogurt)
• 3 tbsp plain yogurt

Lemon Syrup
• Juice of 1 lemon
• 50 ml water
• 50 g sugar

Vanilla Bean Mascarpone Mousse
• 65 g mascarpone cheese
• 20 g unsalted butter
• 7 g powdered gelatin
• 2 egg whites
• 45 g sugar
• 60 ml fresh cream
• 20 g sugar
• ½ vanilla pod

Lemon Yogurt Glacage
• 8 g corn starch
• 7 g gelatin powder
• 4 tbsp lemon curd (loosen by dipping the jar in warm water for about 5 minutes or microwave on high for 10 seconds, then let cool to room temperature)
• 2 tbsp plain yogurt
• 90 g sugar
• 50 g glucose/corn syrup
• 30 ml water
• 100 ml fresh cream
• 70 g white chocolate
• Yellow food colouring (optional)

Decoration
• 30 g milk chocolate (melted)
• Little flower shaped fondant
• Red jam

How to make:
Genoise Cake
1) Beat the eggs and sugar in a stand mixer or with an electric whisker until super fluffy (around 6-8 minutes). You can tell by when the whisk is lifted the batter will fall into ribbon and the batter won’t dissolve back again and disappear.
2) Sift in the flour and salt then add the lemon zest, fold the batter while turning the bowl just until the flour clumps is no longer there and trying to keep the air in the batter as much as possible.
3) Add the melted butter, milk and vanilla, fold just until the liquid mixed in.
4) Pour into a 20×20 cm greased and lined baking pan, level the top and the sides, bake in a preheated oven at 180°C or 360°F for 20-25 minutes of until the middle part is springy when touched and the edges is golden brown.
5) Let cool then unmold. With a circle cutter the size of your molds, cut circles.
You may not get 8 perfect circles but you can cut semi circles from the sides and some pieces to make it into a perfect round. Just like a jigsaw puzzle!

Strawberry Basil Jelly
6) Mix the yogurt and gelatin, stir well. Set aside.
7) In a saucepan, put the cut strawberries, basil, sugar and water then bring to a boil until all the strawberries are soft. Roughly mash the strawberries and basil with a fork, cook for another 3 minutes.
8) Turn off the heat then add in the yogurt gelatin mixture. Stir until all dissolved.
9) Strain the jelly mixture into an 8×8 cm mold lined with aluminum foil or put it into an 8×8 cm ziplock bag, take as much air as possible from the bag then seal it. Rest it on a flat surface.
10) Put in the freezer until solid. Then cut the plastic bag or foil, with a small round cutter (I just used a big pipping tip around 3 cm in diameter, dipped the round side in warm water), cut the jelly into small round disks. Refrigerate until ready to use.

Lemon Syrup
11) Put all the ingredients together in a saucepan then bring to a boil. Let cool to room temperature.

Vanilla Bean Mascarpone Mousse
12) Take 2 tbsp cream then mix with the gelatin. Set aside to bloom.
13) In a saucepan, combine the mascarpone and butter. Melt on low heat just until the butter melted, stir in the bloomed gelatin until all melted. Set aside to cool slightly.
14) Whip the egg whites with the 45g sugar until stiff peak with an electric mixer or a stand mixer.
15) Split the vanilla pod then scrape out the seeds, put it into the remaining cream then whip the cream with the 20g sugar until soft peak with the same beater that used to whip the egg whites.
16) Add a spoonful of the whipped cream into the slightly cooled mascarpone mixture, then mix (you don’t need to be too gentle). Pour all the mascarpone mixture to the remaining cream then fold gently.
17) Add a spoonful of the whipped egg to the cream mixture then with a wire whisk, whisk them until roughly combined. Pour all the cream mixture to the egg white mixture then whisk gently until no lumps of egg whites are left.
18) Pour the mousse into a silicone dome mold nearly all the way to the top (leave around ½ cm space).
19) Set the mousse in the fridge for 5-6 hours (I left it overnight).

Assembly
20) Once the mousse has set, take it out then with a spoon (preferably a round spoon like a scoop, I used a melon baller) dipped in hot water, scoop the middle part of the mousse creating a well in the middle the size of the strawberry jelly disk. Reserve the scooped mousse bits in a bowl.
21) Fill the well with the lemon curd (room temperature or dipped in a warm water bath for about 5 minutes to loosen the lemon curd) ¾ of the way. Then top the lemon curd with the strawberry jelly.
22) Put the reserved scooped mousse bits, into the microwave 10 seconds burst on medium power just until the edges melted (not hot or it might cook the egg), then stir until all has melted.
23) Brush the genoise with the lemon syrup. This will moistened the cake.
24) Smear enough melted mousse on top of the dome mousse just enough to stick the genoise cake.
25) Put it into the freezer until ready to glaze.
Freezing the dome overnight will be easier for the glacing part but I didn’t bother to do that since I’ve set the mousse overnight.

Lemon Yogurt Glacage
26) Mix the yogurt with the gelatin. Set aside to bloom.
27) Mix the lemon curd with the corn starch. Stir until dissolved.
28) In a saucepan, mix the sugar, glucose/corn syrup and water. Bring to a boil until all the sugar has dissolved. Pour in the cream then stir until all combined, then add in the corn starch and lemon curd mixture, keep stirring until thickened. Cook for another minute to cook the flour (so there won’t be any raw flour taste).
29) Turn off the heat, then stir in the yogurt gelatin mixture until dissolved.
30) Over a sift on top of the white chocolate, strain the cooked mixture to remove any lumps, then stir the chocolate until all melted. Add the yellow food colouring if the colour is not bright enough.
31) Let cool to room temperature, not in the fridge as it will sets up.

Glazing
32) Remove the lemon dome out of the mold, set it on a glass with a smaller diameter than the dome with a pan underneath to catch the dripping glacage. Pour the cooled glacage over the lemon dome (pouring a lot of the glacage will ensure even coating). Set it back in the fridge until firm.
You can just scoop back the glacage from the pan to glace the other lemon domes.
If the glacage gets to thick to pour, melt them back in a low heat or in a microwave. But if it’s too hot, you need to let it cool back down to room temperature or else it will melt the mousse if the glacage is too hot.

33) (optional) Do the second coat on the lemon domes. Then set it back again in the fridge before decorating.

Decoration
34) Pipe twine like swirls with the melted chocolate on top of the domes.
35) Using more chocolate, stick the little flower fondants scattered all pver the lemon dome then dot with red coloured jam in the middle.

Galette Des Rois {Pithivier Filled with Almond Frangipane}

20160224-105536-39336090.jpgQui sera la reine ou le roi?
Who will be the queen or the king?

A classic french pastry that is traditionally eaten at L’ephiphanie. Similar to the cake eaten during mardi gras, the king cake. Traditionally in galette des rois or the king cake there will be a trinket, or a bean (called la fève in french) where will be put inside the cake and who ever get the bean or trinket in their piece of cake will be crowned the king or the queen for the day.

This recipe is super easy and fast. Well here I’m cheating by using ready made puff pastry but if you choose to make it from scratch, you should make the puff pastry a day or two before. Or alternatively, you can make a rough puff which is a faster version of classic puff pastry. I like to use this recipe for a quick rough puff pastry.

20160223-195138-71498095.jpgFirst component to make for this galette des rois is the almond frangipane. And to make the frangipane first you need to make crème pâtissière or pastry cream.

The ingredients are egg yolks, vanilla pod (or good quality vanilla extract), sugar, flour and corn startch and milk. Basic ingredients to make pastry cream.

20160223-203737-74257435.jpgScrape the vanilla bean from the vanilla pod, put the vanilla seeds and pod into the milk then heat them just until simmering.

20160223-204301-74581409.jpgCombine the yolks, sugar, flour and corn starch then whisk until all has combined.

20160223-205030-75030147.jpgOnce the milk has come to a simmer, slowly pour them to the yolk mixture while whisking so that the egg won’t scramble.

20160223-210838-76118936.jpgPour them back into the saucepan then whisk constantly until the mixture thickens.

I mean.. Look at those vanilla bean specks. My kind of foodporn.

Anyway, cover the top with cling film touching the top of the pastry cream so a skin won’t form on the pastry cream. Chill it in the fridge.

20160223-211718-76638589.jpgNext up is the almond part. This part will need softened butter, brown and white sugar, almond powder, corn starch, egg, vanilla extract and rum.

20160223-214239-78159902.jpgThis part is all about mixing everything up. I even use the same bowl with the one I use to whisk the yolks for the pastry cream. Less dishes to wash, right?

Just combine the butter and sugar,
Whisk
Add the corn starch and almond powder,
Whisk
Then lastly the egg, vanilla and rum.

20160224-003738-2258892.jpgRemember the pastry cream we made earlier? It’s time to take them out once chilled. It’s gonna be stiff and looks like a blob of jelly, so just whisk it until it gets creamy again.

Again, I didn’t even bother to transfer the cream from the pan, just cover with cling fling then pop it into the fridge. Less dishes to wash! Seriously. Washing dishes is not a fun thing at least for me.

20160224-004133-2493960.jpgNow just combine the almond mixture with the pastry cream to make the frangipane.

20160224-012034-4834213.jpgI’ve wrote in the beginning that I’m using ready made puff pastry. Seriously, I don’t normally like to use ready made stuff, if I can make it my own, I will. But puff pastry from scratch is just a pain in the butt, also takes a long time.

20160224-012525-5125044.jpgSo here what I did with the puff pastry, I stick 2 sheets of puff pastry together just by brushing the surface with some water, then roll it thinner.

All I wanted to do was to double the layers of the puff. I made a set of those then cut it with a circle cutter.
So you’re going to have 2 circles of doubled puff pastry.
Prick the puff with a fork.

20160224-013330-5610842.jpgPut the frangipane filling in the middle then brush the sides with some egg wash.

20160224-013437-5677785.jpgNext up, put the other circle of puff pastry on top then just simply seal the edges.

20160224-194601-71161411.jpgI used a fork to make a scallop pattern on the edge of the galette. This will make the traditional edge of a galette des rois also helps to seal it better.

Although I did not do a very good job because a little bit of the filling ooze out. But it’s not a problem really.

20160224-200050-72050320.jpgSmear the top of the galette with an egg wash for a golden top.

20160224-211827-76707794.jpgScorch the top with the back of a knife. Here I made the traditional pattern but you can do any pattern you like.

And… Bake!

20160224-212250-76970555.jpgClassic french pastry is rustic but still taste out of this world. That’s why French pastries have a special place in my heart… ❤️
I love french pastries that much that I learn the language french.. Just because..

20160227-231006-83406373.jpgLook at that layers though! Yes I did notice that the middle of the galette curved… Here are my problems, I did not fill it enough because I was afraid that it will leak too much, and why? It’s because I made the filling way too runny.
Note to self, incorporate more pastry cream to almond cream….

20160227-231454-83694297.jpgBut this galette des rois taste amazing nevertheless. No doubt about that.

I glazed the top of the galette des rois with some honey (heated just until it’s runny enough to be brushed on top of the galette).

Don’t forget to crown the king or queen to whoever get the trinket or bean.

20160227-231738-83858357.jpgAnd I’m sure you want to see the inside so here you go! The almond filling with the crispy puff combination is the best. You can never go wrong with this one.

I’ve said it before and i’m gonna say it again, I LOVE french pastry with almond on it. Financier, almond croissant, frangipane tart, gâteau amandine, macarons.. Oh the list goes on.

20160227-233845-85125248.jpgHave a great one everybody!

20160227-234511-85511711.jpg

Galette des Rois recipe
Make 1 cake of 23 cm in diameter

Ingredients:
• 4 sheets puff pastry (20x20cm)

• 1 cup milk
• 1 vanilla pod/ 1 tsp vanilla extract
• 50 g white granulated sugar
• 3 egg yolks
• 10 g all-purpose flour
• 12 g corn starch

• 70 g unsalted butter (softened)
• 30 g white sugar
• 40 g brown sugar
• 1 pinch of salt
• 75 g almond powder
• 15 g cornstarch
• 1 egg
• 1 tbsp dark rum (optional)
• 1 tsp vanilla extract

• 1 egg (beaten for the egg wash)
• Honey/ agave nectar (heated slightly)

How to make:
1) Make the pastry cream: split vanilla bean then scrape out the seeds, put it into the milk pan then heat them up just until it comes to a simmer.

In another bowl whisk together the egg yolks, sugar, cornstarch and flour.

Slowly stream the heated milk into the yolk mixture while whisking.

Strain the mixture right back into the pot (to remove the vanilla pod) then heat them back up while constantly whisking until the mixture has thickened.

Cover the top of the pastry cream with cling wrap (touching the surface of the pastry cream) then put it in the freezer to cool faster.

2) Make the almond cream: beat the softened butter with the white and brown sugar until fluffy then add the cornstarch, salt and almond powder, continue beating then add the egg, rum and vanilla, keep beating for 5 minutes or until the batter thickened slightly.

3) Whisk the chilled pastry cream until it gets creamy again then combine the pastry cream with the almond cream.

4) Brush a little water on 1 side of the puff pastry then stick another layer of it, dust with flour then roll it until it fits the round cutter. Then cut a circle of the puff pastry, prick them with fork all over the layer. Repeat with the other 2 layers or puff pastry.

5) On a baking paper, put 1 layer of puff then put the almond frangipane in the middle. Brush the side with egg wash then close the top with another layer of puff pastry. Push alongside the circle to seal then using a fork or a blunt knife, make scallop pattern by pushing the fork onto the sides of the galette des rois (see picture above).

6) Brush the top with egg wash then make the pattern of galette des rois on top.

7) Bake in a preheated oven at 200°C or 390°F for 20 minutes then lower the temperature to 190°C or 375°F for another 35 minutes or until golden brown all the way through.

8) Immediately brush the top with warm honey once out of the oven.

9) Serve warm and enjoy!

Pear Almond Tart

20160120-222517-80717677.jpgI love any french pastry that includes almond on it. I love macarons, financier, pithivier, any dessert with frangipane and also I can eat almond croissant for breakfast everyday (setting aside the calories). I love the flavours and the texture and everything about it.

Actually, I’ve made this pear almond tart around last october. I’ve been meaning to post it but another dishes comes up and I’ve been keeping this one in my archive.

Now it’s time to share this awesome dessert!

On to the cooking then.

20160124-022050-8450682.jpgFirst thing first is the pastry crust. I’ve made this a couple of time and I’ve explain the how to make the perfect buttery and crispy crust for the tart on my earl grey creme brûlée tartlets recipe.
But here I’ve decided to tweak the recipe a bit.

Start with some cold butter, sugar, salt, milk, egg yolk and flour.

20160124-022141-8501992.jpgCombine the sugar, salt, flour and butter in a bowl.

Now this part is my favourite thing to do in making shortcrust pastry…

20160124-022239-8559631.jpgWhich is rubbing the butter and flour together.
I have no idea why but I love love love to do this.

You need to combine it until it looks roughly like coarse sand.
I like to stop until most of the butter has been incorporated but there’s still some big chunks on it. Just to be sure I did not work the butter too much.. Need to keep it cold to make a great pastry.

20160124-022341-8621486.jpgNow that’s done, put in the yolk and mix them up.

Be sure not to over work it!

No one wants a tough base on their tart. Don’t knead it, so that the gluten doesn’t develop.

20160124-022831-8911661.jpgWrap the dough in some cling film them put in the fridge for 30 minutes.

This process helps to relax the dough, again, in order to not resulting in a tough pastry

20160124-022729-8849371.jpgOnce chilled, roll them into the desired thickness then fit it into a buttered and floured tart pan, prick the bottom of the base with fork to prevent the air being trap and making a bump on the base while baking.

Put it back into the fridge until needed

20160125-132951-48591334.jpgNow on to the poached pear.

The ingredients are super simple. You’ll need pears (of course), sugar, water, cinnamon and vanilla.

I would definitely recommend using cinnamon sticks but turns out I’m out of those. For the vanilla I’m using powdered vanilla which works great but if you want to use vanilla pods, it’s up to you, I just felt that it’s kind of a waste since we’re not using the seeds (won’t show anyway in the final product).

20160125-133424-48864309.jpgJust peel and core the pears, cut them in half, throw it into the saucepan with water, sugar, vanilla and cinnamon.

Boil it until the pears begin to soften.

20160125-133938-49178093.jpgMeanwhile the pears are cooking, let’s make the almond filling!

The ingredients to make the filling are eggs, almond powder, vanilla extract, rhum, corn flour, sugar and softened butter.

This part couldn’t be any easier, just dump everything in a bowl then whisk them until incorporated.

20160125-135301-49981155.jpgPour the almond filling into the tart case.

Cut the poached pears into quarters and slice them diagonally into thin slices, then arrange them immediately on top of the almond cream.

Got to be honest here, this is the first time I’ve made this pear almond tart in this size, usually I made some in personal sizes but I thought making big ones will look better in photo. Also it’s the first time I’m using this tart pan. So.. As you may notice, the almond filling just fills up half of the pan. I just realise that the tart pan’s side is that high and I end up not having enough almond filling.

Anyway, The recipe below is for the portion of slightly shallower tart pan, you can see the size below.

20160125-144155-52915886.jpgBake the pear almond tart until golden brown and I put some glaze on top of the whole thing, especially on the pears to make it extra shiny.

For the glaze I’m using some mirror glaze. But you can use apricot jam, marmalade or honey mix with a bit of water just to make it easier to apply, but it won’t be as shiny though.

And dust with icing sugar!

20160125-144512-53112546.jpgAnyway, this photo was taken before I got into the real food photography stuff. Before I use any props to enhance the photo. Still the good ‘ol fashion photo of food.

20160125-145600-53760081.jpgLook at how shiny it is! I just wish I’ve got enough fillings to fill it all the way up.

I wouldn’t mind a thick filling of almond cream… Loooooooove almonds in french pastry.

20160125-145804-53884069.jpgI’m sure you want to see the inside of the pear almond tart. Here you go!

I hate how when I watch or read a recipe that seem so good but they don’t show how it look on the inside… Why?! Why are you torturing me?! Let me see the filling!!

But of course, as a fellow food blogger, I kinda know why not.. Some of the possible reasons are either it doesn’t look as good as the outside, or they forgot to take a picture of it, or the pictures are bad so they decided not to post it, or it was meant to be for someone (how can you give someone a cake that has been cut?), probably so much more reasons.

I guess what I’m saying is that I wish to see the inside of the food and don’t like if they don’t show it, but I might do it later in the future (or any previous post) so as a disclaimer I’m just putting it out there.

20160125-205603-75363733.jpgOh yeah, you can see the buttery crispy crust with the sweet vanilla and rhum almond filling and cinnamon poached pear… All comes together to one rustic piece of pie….

20160125-205900-75540046.jpgA piece of pear almond tart for you and the rest is for me.

20160127-101554-36954116.jpgHave a great one everybody!

20160127-101640-37000545.jpg

Pear Almond tart recipe
Makes 1 tart diameter of 23cm height 2cm

Crust ingredients:
• 200g pastry flour
• 1tsp salt
• 60g sugar
• 75g unsalted butter (cold)
• 1 egg yolk
• 25-30 ml milk (use 25 first, if need more add the rest)

Filling ingredients:
For the poached pears:
• 2 pears
• 80g sugar
• 1 cup water
• 1 cinnamon stick
• ½ tsp vanilla powder/ 1 tsp vanilla extract/ ½ vanilla pod

For the almond cream:
• 100g unsalted butter (room temperature)
• 100g almond powder
• 10g corn flour
• 80g powdered sugar
• 1 egg
• 2 tsp vanilla extract
• 1 tbsp dark rhum

Decoration:
• to glaze: mirror glace/ apricot jam/ marmalade/ honey (diluted with a bit of water)
• powdered sugar

How to make:
Make the base:
1) Combine flour, salt and sugar in a bowl then add the cold butter, rub them together until resembles coarse sand. Add the egg yolk and milk, mix just until combined, wrap the dough in cling film, put in the fridge for at least 30 minutes.
2) Butter and flour the tart pan. Roll the chilled dough then fit it into the pan, prick the bottom base with fork then put in the fridge until ready to use.
Poach the pears:
3) Peel and core the pears then cut in half.
4) Combine the sugar, water, cinnamon and vanilla then the pears.
5) Boil just until the pears start to soften. Once boiled, let cool to touch.
Make the almond cream:
6) Cream the butter then add the almond, corn flour and sugar, beat until combined and creamy.
7) Add the egg, vanilla and rhum, mix until combined
Assembly:
8) Pour the almond cream into the tart shell.
9) Cut the pear halfs into quarter then slice horizontally into thin slices.
10) Put directly on top of the almond cream, repeat until full circle.
11) Bake at 180°C or 360°F for 30-40 minutes until the almond cream is golden brown.
Finishing:
12) Take out, let cool slightly then brush the top (especially the pears) with the glaze of your choice.
13) Put a plate smaller than the pan in the middle then sift some powdered sugar on the sides.

Profiterole (choux pastry)

20140517-151423.jpgmaybe some of you didn’t know the difference between profiterole and choux pastry. Choux is the pastry casing, which then when we fill it with creme pattisiere will be called profiterole or cream puffs.
I don’t know whether you know beard papa or not, they are shops from Japan that sells profiterole and I LOVE THEM! I guess i could say that this is the copycat version of beard papa. They use the Japanese recipe that is called pai shuu. The first time i made choux pastry, they were fine when i took it out of the oven but then once they’re cooled, they gone soggy. After much time troubleshooting i found the answer!

Profiterole is not complete without their cream filling. A good creme pattisiere. Oh yeah. I finally get my hands on vanilla beans and i’m so excited! I actually use creme diplomat, which is combining creme pattisiere with whipped cream to get that fluffy, smoother and lighter taste. It is optional, you could go with just creme pattisiere. For the creme pattisiere i use all FULL FAT ingredients. Oh yeah.. As frightening as it sound it taste like heaven. Trust me.. You want full fat milk, cream, REAL butter. No body said that this would be a diet friendly food is it? But seriously, it’ll be worth it.
Let’s get started shall we? First is to make the creme pattisiere.
Creme pattisiere ingredients:

20140518-174633.jpgegg yolks, sugar, butter, cornflour+flour, milk, vanilla pod.
You could of course use vanilla extract if you can’t get vanilla pod.

20140518-211842.jpgfirst thing first split the vanilla beans lengthwise into half and scrape the beans.

20140518-212455.jpgput the vanilla beans and pod into the milk and bring to a boil.

20140518-212757.jpgwhisk the yolks, sugar, corn flour and flour in another bowl. Once the milk has boiled, strain the milk little by little into the yolk while whisking so they don’t scramble. Put them back into the heat while whisking constantly.

20140518-213702.jpgit will get thick and creamy

20140519-230507.jpgcover with cling film (it has to touch the surface of the cream to prevent it from forming a layer) and put them in the fridge to cool.

Next is to make the choux crust. It’s going to be a sweet and crispy crust on top of the choux pastry. Choux recipe usually don’t use this kind of crust, they usually use something called sable. This is the difference between usual choux and pai shuu. But seriously, this crust is waaaaay simpler and it just makes all the difference.
Choux crust ingredients are:

20140520-191940.jpgicing sugar, flour, butter.

20140520-193603.jpg all you need to do is melt the butter and stir in the sugar and flour. Easy peasy.

Now finally let’s get on to the choux pastry shall we?
Choux pastry ingredients:

20140520-193401.jpgeggs, flour, butter, water

20140520-194038.jpgput the butter and water in a pan and heat it until it boils, dump the flour and whisk until they all clump together and the dough comes away from the side of the pan. Take them off the heat and stir to cool them off a little bit

20140520-194942.jpgstir in the eggs one by one. It will look like they won’t come together at first but keep stirring.

20140520-195320.jpgstir until you got a smooth dough.

20140520-195558.jpgfit the dough into a pastry bag and pipe dollops of choux dough. For the pointy top, you could use a wet finger and pat it lightly.

20140520-195815.jpgput the choux crust on top of the choux pastry and bake!

20140520-200034.jpgremember when i said i used to make choux and it turn soggy when it cooled down? This is the answer i’ve discovered. Once the choux is baked, turn down the heat and bake a little longer. It will make the choux pastry dried out and resulting into crispy choux pastry. They even store well too. They could last for more that a week and stay crispy (but not filled with the cream of course).

20140520-200522.jpganyway maybe i should’ve give them more space….

20140520-201053.jpgonce the pastry cream cooled, whipped some whipped cream then stir in the pastry cream to create a lighter filling

20140520-201411.jpgi don’t know why but i just got a thing when i see specks of vanilla bean on cream based dessert…
Fit the cream into a pastry bag with a tip (just to make it easier to pipe), make a hole in your choux on the bottom or side and pipe those lovely cream inside

20140520-202137.jpglook at that…

20140520-202356.jpgAnd a little dust of icing sugar won’t hurt…

20140520-203003.jpgooohh yeah…. That’s the stuff…

Some tips to maintain a crispy choux pastry:
1) don’t put your choux pastry in the fridge. They’ll keep for a good couple of weeks even in room temperature.
2) it is better to fill the cream as close to the time you’re going to serve it.
3) if you want, you could pre heat the choux for a couple of minutes on the oven before serving.

Pastry cream ingredients:
• 300 ml full fat milk
• 3 egg yolks
• 3 tbsp corn flour
• 1 tbsp plain flour
• 100 g sugar
• Vanilla pod or good quality vanilla essence
• 30 g butter
• 250 ml heavy cream
How to make:
1) Split the vanilla pod in half and scrape the beans. Put the beans and the pod into the milk and bring to boil.
2) In another bowl whisk the egg yolks, corn flour,plain flour and sugar until pale and creamy. Pour the boiling milk through a strainer little by little into the egg yolk while whisking constantly.
3) Pour the mixture back into the pan and heat it on medium low heat while whisking constantly until it gets thick. Put it in the fridge to cool, wrap the bowl in cling film touching the surface of the cream.
4) Once cooled, whipped out heavy cream, fold in the pastry cream to the whipped cream and fit them to a pastry bag.

Choux crust ingredients:
• 30 g butter
• ⅓ cup icing sugar
• ⅓ cup plain flour

How to make:
Melt butter, stir in the flour and sugar until it become a crumbly dough

Choux pastry ingredients:
• ¾ cup water
• 120g salted butter
• 1¼ cup flour
• 4 eggs + approximately 1 egg white (i use the leftover whites from the pastry cream)

How to make
1) Put the water and butter in a pan and put it on the heat until it’s boiling.
2) Once boiled, stir in the flour. It will comes away from the pan, transfer to another bowl to cool a bit.
3) Lightly whisk the eggs and egg white, stir in little by little in 5 addition into the slightly cooled choux dough. It will look like they won’t come together at first but keep stirring until it’s creamy.
4) Transfer to pipping bag, pipe blobs of the dough into baking pan lined with parchment paper, using a slightly wet finger dab the pointy end.
5) Put the choux crust on top of the dough and bake on a preheated oven to 220C for 30 minutes, and turn the heat down to the minimum heat setting (mine is 100C) for another 30-40 minutes to dry them out.
6) Let the choux cool, then make a hole on the bottom or the side of the choux, pipe in the pastry cream and you got your profiterole!